Starting a fire without matches isn’t just a trick from survival films — it’s a real-life skill that can save you during a hike, camping trip, or an emergency. In the wild, fire means warmth, food, light, a rescue signal, and even psychological comfort. That’s why every traveller, hiker, or anyone who loves the outdoors should know how to make fire without matches or a lighter.
There are many reasons you might be left without an ignition source: a wet lighter, forgotten matches, strong wind or rain. But even then, you can build a campfire with improvised tools if you have the basics down and keep calm. The essentials are clear thinking, logic, and following the right sequence of steps.
🔥 Why fire is the most important survival element
- Warmth: helps you heat up in cold weather or after rain;
- Food: you can cook meat, fish, vegetables, and boil water;
- Protection: smoke and flames deter wild animals and insects;
- Light: at night it helps with orientation and creates a safe zone;
- Signal: smoke is visible from afar — use it to send an SOS.
In this guide, we’ll cover the most effective ways to start a fire without matches: from classic friction methods to using modern improvised means — batteries, lenses, foil, and more. Each one is time-tested and can be decisive in a survival situation.
Ready to channel your inner adventurer? Let’s dive in — learn how to light a fire in any conditions.
Mechanical ways to start a fire without matches: friction, fire steel and other methods
When you’re left without a fire source, the most reliable approach is to use friction. It’s an ancient technique that’s still relevant today. It takes time, patience, and the right materials, but with proper setup you can ignite a fire even in the wild.
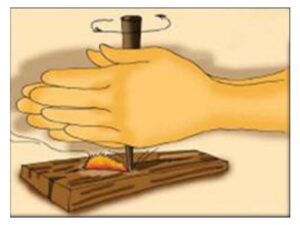
🔥 Method No. 1. Fire by rubbing wood
This is one of the oldest methods. You’ll need a dry wooden board (aspen, willow, poplar) and a spindle made from soft wood. Carve a small depression in the board and place a bundle of tinder nearby — dry moss, birch bark, grass, or wood shavings. Insert the spindle into the notch and spin it quickly between your palms to create friction. When you see smoke, transfer the ember to the tinder and gently blow until you get flame.
- Materials: aspen, poplar, willow, or cedar;
- Tinder: birch bark, dry grass, moss, plant down, cotton pad;
- Tip: work in dry weather — moisture reduces effectiveness.
⚙️ Method No. 2. Using a bow drill
This is an upgraded version of the previous technique. Instead of spinning the spindle by hand, use a bow with a cord. Wrap it around the spindle so it rotates as you move the bow back and forth. This creates steady friction and produces an ember faster. It’s more efficient than hand-spinning and gives you better control over speed and pressure.
🔥 Method No. 3. Fire steel (ferro rod)
A fire steel or ferrocerium rod is a modern, handy tool often found in outdoor kits. Scrape it with a metal striker to create sparks. The sparks fall onto tinder (for example, a cotton pad, birch bark, or dry grass) and ignite it. The advantage is that it works even when wet and doesn’t require fuel.
- Tip: keep a ferro rod in a waterproof bag among your essentials;
- Ideal tinder: birch bark, cotton wool, dry moss, small shavings.
Mechanical fire-lighting is a true craft. It demands composure, but gives you priceless understanding of nature and confidence in your abilities. Even if you carry a lighter, practise now and then — this skill may prove crucial when the unexpected happens.
Optical and chemical ways to start a fire without matches: magnifying glass, mirror, battery
If you’ve no matches or lighter to hand, don’t panic — nature and simple tech can help. There are several effective ways to start a fire using the sun or basic chemical reactions. These methods don’t require special gear, just attention, a little time, and the right steps.
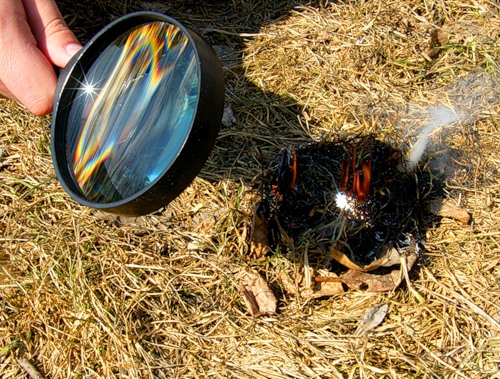
☀️ Method No. 1. Magnifying glass or lens
A classic and one of the most reliable optical methods. On a sunny day, all you need is a magnifying glass, a binocular lens, or other optics. Focus the beam of light on tinder — birch bark, dry grass, or cotton wool. After a few seconds you’ll see smoke, followed by flame. This works best in clear weather.
- Ideal tinder: birch bark, plant down, cotton wool, dry moss;
- Tip: hold the focus steady for 20–40 seconds without shifting;
- Alternative: a camera lens, or glasses with thick lenses.
🔆 Method No. 2. Mirror or torch reflector
If you don’t have a magnifying glass, use any reflective surface: polished metal, a compact mirror, or a torch reflector. Aim the reflected sunlight at a single point on the tinder — concentrated heat will gradually cause ignition. Precision and patience are key.
- Hold the mirror at an angle so the beam hits the tinder exactly;
- You can wrap the mirror in foil to boost reflectivity.
🔋 Method No. 3. Using a battery and foil
If you have a standard battery (AA or AAA) and some foil (for example, from a chewing gum wrapper), you can produce a flame. Cut a thin strip of foil, fold it in the middle, and touch both battery terminals at the same time. The centre will heat up — quickly bring it to the tinder.
- Caution: this method is instantaneous; don’t touch the hot foil;
- Tip: keep tinder ready, as the reaction lasts only a few seconds.
🧪 Method No. 4. Chemical reaction: potassium permanganate + glycerine or sugar
Your first-aid kit may include potassium permanganate and glycerine. Mix a few crystals of permanganate with a drop of glycerine to trigger a heat-releasing reaction — enough to ignite tinder. A mixture of sugar and potassium permanganate works similarly.
- Work on a safe surface and don’t lean over the reaction;
- Have your tinder in place beforehand to catch the ember immediately.
These methods need minimal kit but maximum focus. They’re especially useful in emergencies when you must light a fire without matches or a lighter. Make a note of a few options and practise in advance — one day it could save your trip, or even your life.
How to light a fire in windy or wet weather: practical tips
The hardest time to start a fire is after rain or in strong winds. Wet wood won’t catch, and gusts snuff out the flame. Even so, there are tried-and-tested techniques to build a stable ember bed and keep the heat going.
💨 Lighting a fire in windy weather
- Pick the right spot. Look for natural shelter — behind a boulder, hill, or fallen tree. If there’s none, build a windbreak from branches or stones.
- Create a screen. Use your backpack, a sheet of film, or even your body to shield the flame from the wind while igniting.
- Start small. Use easy-to-light materials — cotton wool, dry moss, birch bark, or cotton pads soaked in wax or fat.
- Add fuel gradually. Begin with twigs, then small sticks, and only add larger logs once the flame is steady.
💧 Lighting a fire after rain or on damp ground
- Make a dry base. Lay down a layer of bark, dry sticks, or stones so the fire doesn’t touch wet ground.
- Remove the wet layer. Even a soaked branch can be dry inside — split it with a knife and use the core.
- Use natural starters. Dry birch bark, cones, needles, or old stumps are excellent heat sources even after rain.
- Have a reserve. Always keep dry tinder (cotton wool, waxed pads, shavings) in a sealed bag.
🔥 Keeping a steady fire
Once the fire’s going, don’t lose it. Watch the wind direction, add fuel gradually, and avoid excess smoke. If you have to leave it, wrap embers in ash or cover with a metal sheet — they’ll last longer. For long, even burning, use hardwoods such as oak, hornbeam, beech, or birch.
💡 Handy tip:
If the fire is dying, don’t blast it — you’ll scatter the embers. Instead, gently blow through a straw or hollow twig aimed at the centre of the ember bed.
The ability to start a fire in any conditions is a core skill for anyone exploring the outdoors. Remember: patience, dry tinder, and the right strategy are the three pillars of your warmth, light, and safety.
Types of campfire in the wild: which shape to choose for cooking or warmth
For a fire to be not only atmospheric but also effective and safe, it’s crucial to choose the right fire lay. The setup depends on your goal — cooking, drying clothes, heating, signalling for rescuers, or overnighting. Below are the most popular campfire types for hikers, hunters, and outdoor lovers.
🔥 “Pyramid” — a classic for quick cooking
This style is ideal when you need to boil water or cook fast. Sticks are placed vertically around the tinder in a pyramid shape. It heats well and produces embers quickly, but doesn’t last long. Perfect for a short burn in dry weather.
🏗️ “Log cabin” — stable flame and even heat
Built from sticks stacked like a small cabin. This layout is convenient for cooking on skewers or a frying pan. It gives an even flame, is easy to control, and lets you place a grate or cookware on top.
🌲 “Star” — a fuel-efficient, long-burning fire
Five or six thick branches are laid with their ends meeting in the centre and inched inwards as they burn. A classic for overnight warmth or watch duty. It burns slowly, needs little tending, and uses minimal fuel.
🔥 “Nodya” — a field stove for winter warmth
This fire consists of two large logs laid one atop the other with tinder and kindling in between. A “nodya” burns for 6–8 hours, throws out a lot of heat, and works well for sleeping outdoors in the cold. Hunters and winter trekkers use it often.
🚨 “Signal fire” — to mark your location
If you’re lost or need help, light a fire in an open area. For better visibility, add green branches or fresh grass — the smoke will be dense and visible from afar. At night, bright flames are the signal; by day, smoke does the job.
💡 Recommendation:
After choosing your fire type, clear the site of dry grass and make a ring of stones or soil. This reduces the risk of a forest fire. Remember: any open fire demands responsibility — safe behaviour protects both nature and lives.
Common mistakes when starting a fire: how to avoid failure and danger
Even with dry logs and a lighter, sometimes the fire just won’t catch. This usually comes down to a poor choice of spot, a weak layout, or skipping the basics. Below are the most common mistakes every camper should avoid.
❌ Mistake No. 1: a bad location for the fire
Many people light fires in the wind, under trees, or beside dry grass. That not only makes ignition harder — it also raises the risk of wildfire. Choose a flat area sheltered from the wind and cleared of leaves and needles. In mountainous or windy places, make a shallow pit or use stones as a barrier.
💧 Mistake No. 2: using wet fuel
Wet wood smokes, burns poorly, and gives little heat. Check your firewood — it should be light, dry, and sound dull when struck. If you must use damp branches, place them near the flames to dry before feeding them in.
🌀 Mistake No. 3: no ventilation
Flames need oxygen. If you pack the wood too tightly or cap the fire from above, it will suffocate. Leave enough gaps between sticks, especially in the centre where the tinder sits. Air needs to circulate freely.
🔥 Mistake No. 4: too much fuel at the start
Throwing on lots of logs to get a big flame is a common error. Start with thin twigs and kindling, then step up to thicker wood. Otherwise, the fire will choke and die before it has a chance to build.
⛔ Mistake No. 5: using flammable liquids
Petrol, spirits, or oil aren’t for campfires. They can cause explosions or burns. If you need a boost, use safer options: petroleum jelly on cotton, paraffin cubes, or solid fuel tablets.
🧯 Mistake No. 6: leaving the fire unattended
The biggest danger is an unsupervised fire. Never go to sleep or leave the site until the flames are fully out. Smother embers with sand or douse with water, and break up the coals. Remember: even a tiny spark can start a forest fire.
💡 Tip:
To avoid mistakes, remember this simple success formula: dry fuel + free airflow + control. Follow these three rules for steady burning and safety outdoors.
How to maintain and safely extinguish a fire: advice from experienced campers
Getting a fire going is only half the job. It’s just as important to maintain a steady flame and then put it out safely so you don’t leave a dangerous hotspot behind. This is the mark of true outdoor culture and respect for nature.
🔥 How to keep a steady flame
- Add fuel gradually. Don’t throw on big logs straight away — start with smaller sticks, then move up.
- Control airflow. Don’t enclose the fire completely — flames need oxygen.
- Use the “pyramid” or “log cabin”. These classic builds help the fire burn evenly.
- Never leave the fire unattended. Even a weak flame can trigger a forest fire.
🧯 How to extinguish a fire safely when you’re done
Before you leave, make sure the fire is completely out. Even a smouldering ember can reignite.
- Break up the flames with a stick and spread the embers;
- Douse the fire with water or cover it with sand or soil;
- Check there’s no smoke or heat — touch the spot with your palm (carefully!);
- Leave no trace: put stones back and fill the pit so the site looks natural.
🌱 A camper’s eco-ethic
A true outdoor enthusiast always leaves nature clean. Careful fire use is not only about safety but also about preserving forest ecosystems for future generations. If everyone does their bit, our forests will stay green — and fire will be a friend, not a foe.
💡 In summary:
Learning to start a fire without matches is a valuable skill that helps in any conditions. More importantly, learn to control it, use it wisely, and leave no harm. That’s how fire becomes a symbol of life, warmth, and safety in the great outdoors.


No Comment
You can post first response comment.