Drowning First Aid Course
Introduction: knowledge that saves lives while traveling
Relaxing by the sea, lake, or pool is about freedom and new experiences. At the same time, water does not forgive mistakes: cramps, rip currents, sudden depth changes, fatigue, or alcohol can create a critical situation in seconds. The Drowning First Aid Course teaches you how to act calmly and clearly when every minute counts.
Why this is especially important for travelers
When traveling, we often find ourselves in unfamiliar waters and rely solely on our own judgment. Knowing the first aid algorithm is a real safety tool for yourself, your children, and your friends.
- Unfamiliar conditions: seabed terrain, rip channels, waves, tides.
- Limited assistance: remote beaches, language barriers, longer emergency response times.
- Higher-risk activities: SUP boards, kayaking, yachting, snorkeling, diving, water parks.
What the drowning first aid course provides
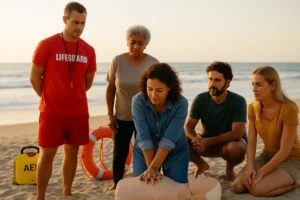
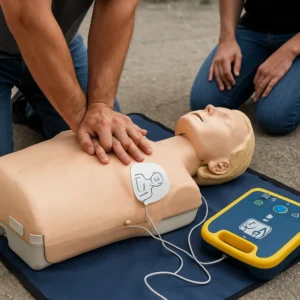
You’ll receive a step-by-step algorithm and hands-on practice using manikins and rescue equipment. This is not just theory “on paper” — it’s real-world training through realistic rescue scenarios.
- Algorithm “See — Call — Rescue — Stabilize”: personal safety, calling 112, extracting from water.
- Condition assessment: consciousness, breathing, pulse, signs of hypoxia and hypothermia.
- Practical skills: 5 rescue breaths, CPR 30:2, use of a pocket mask and AED.
- Complication prevention: actions to minimize the risk of delayed (secondary) drowning.
- Stress management: how to stay calm and coordinate bystanders during an emergency.
Who this material is for
For travelers, parents, instructors, guides, and anyone spending time near water. Below is a complete guide — from understanding types of drowning to a detailed first aid protocol and practical recommendations for taking a certified course.
What is drowning: types, symptoms, and how to recognize a dangerous condition
Definition in simple terms
Drowning is a situation where water blocks a person’s normal breathing (by entering the airways or causing a reflex spasm), leading to a lack of oxygen. The incident may end fatally or non-fatally — but in both cases, correct actions and a medical assessment are required.
Types of drowning
In everyday speech, the terms “dry” and “secondary” drowning are often used. To avoid confusion, remember the practical differences below.
- Aspiration drowning: water enters the airways → coughing, foamy secretions, wheezing, bluish lips.
- Reflex (without significant aspiration): cold or irritation triggers a spasm of the vocal cords → the person cannot inhale, hypoxia develops quickly.
- “Secondary” (delayed complications): hours after a water incident, breathing problems develop (pulmonary edema, inflammation). 24-hour observation is needed.
How to recognize that someone is drowning
A drowning person usually doesn’t shout or wave “for help.” Their movements are involuntary and focused only on keeping the mouth above the water.
- The body is vertical, with no noticeable forward movement.
- The arms slap the surface or move out to the sides “as if to push off the water.”
- The head is tilted back, the mouth at or below the surface, the eyes “glassy.”
- The person periodically slips under the water for 5–20 seconds.
Signs after removal from the water (warning symptoms)
Even if the casualty is conscious, observe them for at least a day. Below are signals that require an immediate medical assessment.
- Worsening cough, wheeze or labored breathing, shortness of breath at rest.
- Bluish lips/nails, chest pain or tightness.
- Drowsiness, confusion, behavioral changes, nausea/vomiting.
- Fever, chills, weakness.
Risk factors on holiday
Most incidents happen due to underestimating the conditions. Assess the environment before swimming — it reduces the risk dramatically.
- Cold water, strong waves, rip channels (rip currents).
- Jumping into unfamiliar waters, diving from piers and rocks.
- Alcohol, fatigue, cramps, dehydration, hypothermia.
- Improperly chosen or faulty rescue equipment.
- Children without constant adult supervision within arm’s reach.
Key takeaway
If “something looks off” — don’t delay: call for help, dial 112, prepare a rescue aid (rope, ring, buoy, board, SUP) and act according to the algorithm in the next section. Your safety is priority No. 1.
Actions in case of drowning: step-by-step rescue algorithm
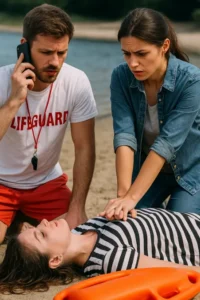
First — your own safety and calling for help
Assess the scene: waves, currents, distance, water temperature, availability of rescue equipment. Shout loudly to alert others and ask someone to call 112 with the message: “Possible drowning, need ambulance and rescuers.” If you have a buoy, board, or rope — use it. Enter the water only if you are confident in your swimming ability and have a floating aid.
Safe removal from the water
From the shore, extend a long object or throw a rope while keeping a low, stable position. In the water, approach from behind, offer a floating object, and use short, calm phrases: “Hold on to the buoy. You’re safe.” In shallow water, turn the victim onto their back while supporting the head and neck.
Assess condition within 10 seconds
Check for response to voice and touch. Open the airway (tilt the head back, lift the chin) and assess breathing for no more than 10 seconds: look for chest movement, listen and feel for air on your cheek. Occasional gasping (agonal breaths) is not normal breathing.
If normal breathing is absent — start CPR
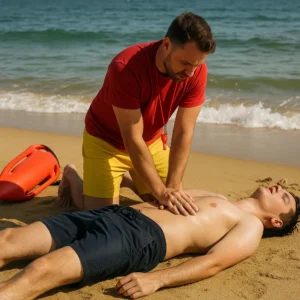
In drowning, ventilation is the priority. Give 5 rescue breaths, then continue with cycles of compressions and breaths. If an AED is available, turn it on immediately and follow the voice prompts.
- 5 rescue breaths: seal the mouth/mask, pinch the nose, each breath ≈1 second with visible chest rise.
- 30 compressions → 2 breaths (30:2): center of the chest, depth ≈5–6 cm, rate 100–120/min. Allow full chest recoil.
- Continue 30:2 until signs of life, arrival of medical personnel, or exhaustion.
If breathing but unconscious
Place the person in a stable recovery position and monitor breathing every minute. Warm them gradually: remove wet clothing, cover with a thermal blanket or jacket. Any drowning episode requires a medical evaluation.
Quick action summary
- Call for help → 112, involve others, prepare rescue equipment.
- Remove safely (from shore or behind, with buoy or board support).
- Assess breathing ≤10 sec — yes/no.
- No breathing: 5 breaths → 30:2 → AED.
- Breathing present: recovery position, warmth, observation.
What not to do
Do not try to “squeeze water out of the lungs” or waste time on ineffective actions. Do not stop CPR without a valid reason. Do not risk your life by diving without flotation support.
First Aid After Water Rescue: Warmth, Stabilization, and Observation
The first minutes: what to do immediately
After removing a person from the water, it’s important to quickly assess their condition and prevent deterioration. Even if the victim regains consciousness, the risk of complications remains for several hours. Your goal is to ensure breathing, warmth, and calmness until medical help arrives.
What to do if the person is conscious
Help them sit or lie in a half-sitting position — this makes breathing easier. Communicate briefly and calmly, explaining every action you take.
- Remove wet clothing, gently dry with a towel, and cover with a blanket or thermal wrap.
- Offer warm drinks in small sips (only if there is no nausea).
- Monitor breathing, skin color, and level of consciousness every few minutes.
Avoid sudden heating (hot baths, strong heaters) — this can cause dangerous fluctuations in blood pressure. Warm the person gradually.
What to do if unconscious but breathing
Place the person in the recovery position (stable side position) to prevent aspiration of vomit. Slightly tilt the head back, keep the mouth open, and ensure the tongue does not block the airway.
- Monitor breathing every minute; if it worsens — start CPR.
- Place dry clothing or a mat under the back to reduce heat loss from the ground.
Signs of hypothermia: what to look for
Even in warm water, the body loses heat quickly. Children and slender individuals are at greater risk. Recognizing symptoms in time can prevent complications.
- Severe shivering or its absence (a sign of deep hypothermia).
- Bluish lips/fingernails, pale or cold skin.
- Confusion, lethargy, drowsiness, or slurred speech.
Act gently: add layers of dry clothing and blankets, give warm drinks (if conscious), and avoid massaging or rapidly heating the limbs.
When medical attention is required
After any drowning episode, a medical examination is mandatory. Some complications (such as pulmonary edema) may appear hours later.
- There was a loss of consciousness or abnormal breathing.
- Persistent coughing, wheezing, shortness of breath, or chest pain/tightness.
- Appearance of nausea, vomiting, fever, drowsiness, or confusion.
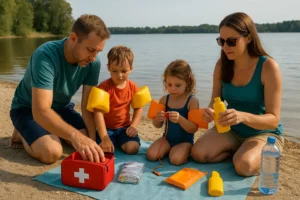
Tip for travelers
Keep a compact “water first aid kit” on hand: thermal blanket, nitrile gloves, antiseptic, wipes, dry bag, and a lightweight rain poncho. Most importantly — practice these actions during a first aid course to build automatic response skills.
Secondary Drowning: the hidden danger after rescue
What is “secondary” drowning in simple terms
After a water incident, a person may look better, but over the next few hours inflammation or pulmonary edema can develop: microdroplets of water irritate the tissues, gas exchange is disrupted, and oxygen shortage increases. That’s why 24-hour observation after any drowning episode is a rule without exceptions.
When to expect symptoms and what to watch for
Signs usually appear within 1–24 hours. If the person swallowed water, was coughing, or was unconscious — the risk is higher. Watch their breathing, behavior, and temperature.
- Worsening cough, wheezing/labored breathing, shortness of breath at rest.
- Bluish lips or nails, pallor, cold sweat.
- Drowsiness, confusion, unusual lethargy or irritability in children.
- Chest pain/tightness, nausea or vomiting, fever.
What to do until medical help arrives
If even one of these symptoms appears — call 112 immediately. Sit the person in a half-sitting position, reassure them, and limit physical activity. Ensure fresh air, loosen tight clothing, and monitor breathing and consciousness.
Home monitoring: how to observe correctly
If healthcare professionals allow home observation, agree that someone stays awake nearby for the first hours. Measure temperature, note skin color, respiratory rate, and energy level. At the slightest deterioration — go to the hospital immediately.
- Provide warmth and rest; offer warm drinks in small sips (only if conscious).
- Do not give alcohol or sedatives — they can mask symptoms.
- Avoid physical exertion and hot baths on the same day.
Takeaway for travelers
“It’s all over” is a dangerous illusion after a water incident. Follow the rule of three: 24-hour observation → attentiveness to breathing and behavior → low threshold for seeing a doctor. These simple steps save lives.
Why Everyone Should Take a Drowning First Aid Course
Practical value: skills that work in real life
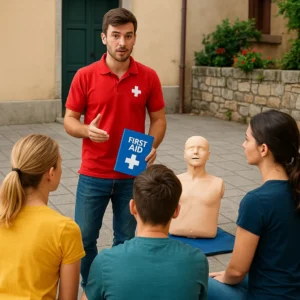
First aid courses are not “just in case” theory. You practice actions on manikins and with real rescue gear: from water extraction to CPR and using an AED. This builds muscle memory that reduces confusion at critical moments.
What a typical course includes
Programs vary by training center, but usually cover basic water safety and pre-medical first aid modules.
- Assessing area safety, calling 112, coordinating with lifeguards.
- Techniques for safe approach and support of a drowning person, using buoys/boards/SUP.
- Drowning algorithm: 5 rescue breaths → 30:2 → AED.
- Recovery position, hypothermia prevention, post-incident observation.
- Specifics of helping children and cases with suspected neck injury.
Training formats
Choose a format that fits your travel plans and schedule. The best results come from blended learning: online theory + in-person practice with an instructor.
- In-person intensive: 1–2 days with simulators, role-play scenarios, and practice in a water environment (pool/beach).
- Blended: online theory (videos/quizzes) plus a few hours of offline practice.
- Advanced modules: for activity instructors (SUP, kayaking, yachting, diving).
Certification and skill refresh
After successfully passing the practicals and test, you receive a certificate (validity usually 1–2 years). It’s recommended to retake the course or do a short update — protocols evolve, and skills fade without practice.
How to choose a reliable course
Before paying, check a few simple criteria — this saves time and ensures quality training.
- Accreditation/reputation: check reviews, instructor experience, and presence of a water module.
- Hands-on, not just lectures: the program should include manikins, AED drills, and practicing the “5 breaths.”
- Small groups: 6–10 people per instructor — more hands-on time.
- Location: courses near open water/a pool are more useful for travelers.
How long it takes and what to prepare
A basic course typically lasts from a few hours to one day; an extended one — up to two days. Bring comfortable clothing, a water bottle, a notebook, and if needed — swim gear for the water module.
Summary
A Drowning First Aid Course is an investment in travel safety. You’ll learn to act clearly, quickly, and safely for yourself and your loved ones. Most importantly — you’ll gain confidence that, in a critical moment, can mean a life saved.
Drowning First Aid Course Abroad
How to find courses abroad
Start with reputable medical training centers in the country you’re visiting: national Red Cross/Red Crescent societies, accredited private training centers, and water clubs (diving, yachting, SUP). Choose programs that include a water module and CPR practice with a focus on drowning.
- Search queries: “first aid drowning course”, “water rescue course”, “CPR AED course + city”.
- Local beach services: lifeguard stations, dive centers, and sailing schools often run their own training.
- Hotels/resorts: ask at reception about partner trainings and guest discounts.
Internationally recognized certificates
For travelers, short intensive courses with hands-on practice and certification in English or the local language are the most convenient. Below are examples commonly available in tourist regions.
- Red Cross / Red Crescent: basic first aid + CPR/AED, sometimes with a water module.
- EFR (Emergency First Response): Primary & Secondary Care, often paired with dive courses.
- PADI Rescue Diver (for divers): water rescue focus + mandatory EFR certificate.
- RLSS / Lifeguard (selected countries): lifeguarding qualifications with emphasis on water safety.
Language and cultural nuances
Ask about the language of instruction and materials. If English/Ukrainian isn’t available, inquire about translation, pictograms, or bilingual summaries. During training, rehearse key commands (“Call emergency”, “Start CPR”, “Bring AED”) so you can act confidently in a real event.
Pay attention to local water safety rules: beach flag systems, surf/swim zones, life jacket requirements for SUP and kayaking, and lifeguard post hours.
How to verify a training center’s reliability
A reliable center publishes the curriculum, duration, instructor-to-group ratio, list of training aids (manikins, AED trainer, buoys/boards), and certification conditions. Ask to see a sample certificate and clarify whether a water scenario is included.
- Includes hands-on practice on manikins and the “5 rescue breaths.”
- The certificate states a validity period and recommendations for recertification.
- Small groups: 6–10 people per instructor — more hands-on time.
Emergency numbers in popular destinations
Note the local emergency number and provide your exact location when calling. In the EU it’s 112; in the USA and Canada — 911; in the United Kingdom — 999 or 112; in Australia — 000; in New Zealand — 111.
Tip for travelers
Planning water activities (yachting, diving, surfing)? Choose a blended format: online theory before the trip + an in-country practical module. This consolidates your knowledge in real conditions and accounts for local rules.
Practical Tips for Travelers: Water Safety, First Aid Kit, and Family Preparedness
Behavior around water: simple rules that really work
Most incidents happen due to underestimating conditions or overconfidence. Before entering the water, observe the beach, check flag signals, currents, and wave activity, and note the presence of a lifeguard post or boundary buoys. Swim parallel to the shore and never cross the main channel.
Avoid swimming alone, especially in poorly lit areas or at night. After drinking alcohol — do not enter the water. If you feel a cramp — roll onto your back, flex your foot to relieve tension, call for help, and move toward the shore.
Minimal “water safety kit” in your backpack
A small first aid kit and a few handy items add almost no weight but significantly increase your safety.
- Thermal blanket (isothermal), nitrile gloves, antiseptic.
- Microfiber towel, lightweight rain poncho, spare dry T-shirt.
- Sun protection (cream, cap/hat), bottle of water with electrolytes.
- Small cord/rope 5–10 m or throw line for shore assistance.
- Whistle and flashlight, waterproof phone case.
Children and water: supervision within arm’s reach
A child can drown silently and within seconds. When a child is in the water — the adult must not look at their phone, read, or get distracted. For small kids — only pools with gradual entry; a vest or inflatable armbands do not replace supervision.
Teach simple rules: don’t run on wet tiles, don’t jump into unknown water, and immediately tell an adult if someone is “acting strange” in the water.
Emergency contact plan and geolocation
Before swimming, check your phone’s battery and network coverage. Save the local emergency number in advance (in the EU — 112). Enable location sharing in your settings; on beaches, remember the number of the lifeguard post or the nearest landmark (café, pier, buoy number).
Quick checklist before entering the water
1) Checked conditions (flags/waves/currents) → 2) Have a buddy → 3) Sober and rested → 4) Know depth and exit points → 5) Child — within “arm’s reach.”
Useful habit
Make it a rule to have a short family briefing before every swim: where you’re swimming, what’s considered a “danger signal,” who calls 112, who runs to get the lifeguard. It takes just a minute, but in a critical moment, it saves precious seconds.
Visual Examples and Training Materials
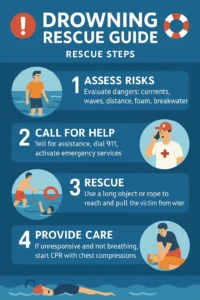
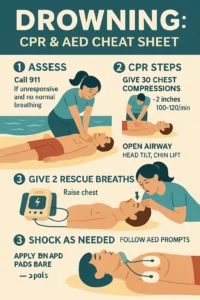
Infographic “Drowning Rescue Algorithm”
A visual diagram helps you remember the sequence of actions without lengthy text. It highlights four key steps: Safety → Extraction → Breathing Assessment → 5 Breaths + 30:2 → AED. Recommendation: save the infographic on your phone and print a small version for your travel first aid kit.
Quick-reference cards
Compact A6 cards work great under stress: minimal text, maximum action. Make two versions — one for adults and one for children. Add local emergency numbers and the name or number of the nearest lifeguard station.
What to include on your quick-reference card
1) “Call → 112” and state location; 2) Safe extraction (rope/buoy/board); 3) Breathing check ≤10 sec; 4) 5 rescue breaths; 5) 30 compressions : 2 breaths (100–120/min, 5–6 cm deep for adults); 6) AED — turn on and follow prompts; 7) Recovery position and warmth if breathing resumes.
Training videos (what to look for)
Videos help visualize the correct technique: hand placement, compression depth, rhythm, and proper seal during breaths. Search for terms like “CPR for drowning adult/child”, “rescue breaths first for drowning”, “AED trainer demo”. Choose videos where the demonstration is done on a manikin with instructor commentary.
Posters for pools or apartments
If you rent a villa with a pool or travel with children, put up a simple poster near the water: “Don’t dive into unknown water,” “Child — within arm’s reach,” “112 — emergency number.” Visual reminders encourage responsibility, even among adults.
How to practice on your own (outside of a course)
Agree on a short “five-minute drill” with your family before swimming: review the algorithm and assign roles. Once a month, practice 2–3 30:2 cycles on a pillow/manikin on dry land, and rehearse chin lift and airway opening techniques.
Small home training kit
An inexpensive film valve/pocket mask, a metronome app (set to 100–120 bpm), a 10-second timer for breathing assessment, and a printed cheat sheet — that’s all you need to maintain your skills between official courses.
Conclusions: life-saving knowledge and next steps for the traveler
Main idea
Drowning happens quietly and quickly. Those who know the response algorithm and have practiced it turn panic into a clear sequence of steps: own safety → extraction → breathing assessment → 5 breaths → 30:2 → AED. These skills most often determine a person’s fate even before medical help arrives.
What you already have from this article
You’ve received a structured explanation of drowning types and signs, a step-by-step pre-medical first aid protocol, guidance on post-incident observation, pointers for choosing courses, and a practical “water kit” for travel.
What to do today
Choose one concrete step and do it — a small action beats a perfect plan for later.
- Save the algorithm infographic and your local emergency number to your phone (EU — 112).
- Add a thermal blanket, gloves, a whistle, and a waterproof phone case to your backpack.
- Enroll in a first aid course (blended: online theory + instructor-led practice).
When you must see a doctor
After any drowning episode, or if there was loss of consciousness, breathing problems, chest pain, drowsiness, or vomiting — a medical examination is required. Symptoms may appear within the next 1–24 hours.
Final tip
Make safety a habit: a brief family briefing before swimming, the “arm’s length” rule for children, sobriety in the water, and regular skill refreshers. It’s simple, inexpensive — and yes, it saves lives.
Frequently Asked Questions
What exactly will I learn to do on the course?
The basic course teaches you to assess safety, correctly extract a casualty from the water without endangering yourself, perform a rapid breathing assessment, deliver 5 rescue breaths, carry out CPR 30:2, and use an AED (defibrillator). You will also practice the recovery position, warming protocol, and post-incident observation.
Is it safe to try to rescue someone on my own?
Rescuer safety is the priority. Call for help first (112) and use the “Shout — Throw — Go” rule: try to provide a flotation aid (rope, buoy, board, SUP). Enter the water only if you are confident in your abilities and have buoyant support. These scenarios are practiced in detail on the course to minimize risks.
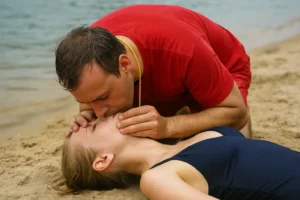
Why give 5 rescue breaths first in drowning, instead of starting compressions right away?
The usual cause of arrest in drowning is hypoxic (lack of oxygen due to water in the airways). Therefore the priority is to restore ventilation with 5 effective breaths, then proceed to cycles of 30 compressions : 2 breaths. The course trains mouth/mask seal and the correct breath volume with visible chest rise.
How does assistance differ for children and infants in drowning?
For children and infants, start with 5 rescue breaths as well. Perform compressions to a depth of approximately 1/3 of the chest (≈4 cm for infants, ≈5 cm for children). For infants, cover the mouth and nose with your mouth; for children, proceed as with adults. Cycle ratios: 30:2 (one rescuer) or 15:2 (two rescuers). These skills are practiced separately on pediatric manikins.
What is “secondary” drowning and how do you avoid missing it after a rescue?
These are delayed complications after a water incident (pulmonary edema/inflammation) that appear within 1–24 hours: shortness of breath, cough, wheezing, drowsiness, behavioral changes, chest pain, fever. After any drowning episode, 24-hour observation is needed, with a low threshold for seeking medical care if any concerning symptoms appear.
How should you warm a casualty after being in the water, and what should you avoid?
Remove wet clothing, gently dry, cover with a thermal blanket/regular blanket, and sit the person in a half-sitting position. Warm gradually and offer warm drinks in small sips (only if conscious and not nauseous). Avoid hot baths and powerful heaters — rapid warming can cause a drop in blood pressure and worsening condition.
Is a medical check-up necessary if the person feels fine after the incident?
Yes. Even without complaints after a brief submersion, there is a risk of delayed complications. A mandatory examination is recommended, especially if there was loss of consciousness, breathing difficulty, cough, vomiting, or chest pain. These signs can appear later, which is why 24-hour observation is important.
How long does the course take and how often should skills be refreshed?
A basic intensive usually lasts 4 to 8 hours (one day), and extended programs up to two days with a water module. Certificates are often valid for 1–2 years. It’s recommended to take a refresher or short update annually — protocols evolve and practical skills fade without regular practice.
Are such courses recognized abroad, and which certificates should a traveler look for?
Look for a medical training center with international presence: Red Cross/Red Crescent, EFR (Emergency First Response), water programs by PADI/SSI (for divers), and national lifesaving societies (RLSS, etc.). It’s important that the program includes a water scenario and hands-on CPR/AED practice. The certificate should state its validity period and recertification recommendations.
What should I pack in a “water” travel first aid kit?
Minimum set: thermal blanket, nitrile gloves, antiseptic, wipes, small microfiber towel, pocket mask/film valve for ventilation, whistle, flashlight, waterproof phone case, short rope/throw line 5–10 m, electrolytes. Add a quick-reference card with the algorithm and the local emergency number (112 in the EU).
What are the most common mistakes by bystanders in drowning incidents?
Major mistakes: risking your own safety without flotation aids, trying to “pour water out” instead of providing ventilation and CPR, failing to call 112, stopping resuscitation too early, and aggressive warming with hot water. Correct approach: call for help, use flotation aids, assess breathing ≤10 sec, perform 5 breaths → 30:2 → AED, warm gradually, and monitor for 24 hours.


No Comment
You can post first response comment.