A makeshift barbecue is a real lifesaver for those who’ve decided to head outdoors on a whim but forgot—or simply don’t have—a classic grill with them. The situation is familiar: the group is ready, the meat is marinated, but there’s no place to cook. What to do? Don’t panic — there’s always a simple solution!
In fact, there are countless ways to set up a DIY barbecue grill in just a few minutes. Using easily available materials — bricks, stones, skewers, branches, poles, or even beer cans — you can create a fully functional cooking area for meat, vegetables, or fish without much effort.
In this article, we’ve gathered the most effective, time-tested methods for making a grill without welding, tools, or special equipment. You’ll discover:
- how to build a stone or brick barbecue in five minutes;
- how to use beer cans or branches to grill kebabs;
- which materials to avoid because of toxicity or fire hazards;
- and how to make an improvised picnic grill without harming nature.
So if you’re looking for DIY barbecue ideas or just want to learn how to cook kebabs without a grill, this guide is for you. Stay tuned — we’ve got plenty of practical tips and clever hacks ahead!
Beer Can Grill — a quick and creative way to make kebabs
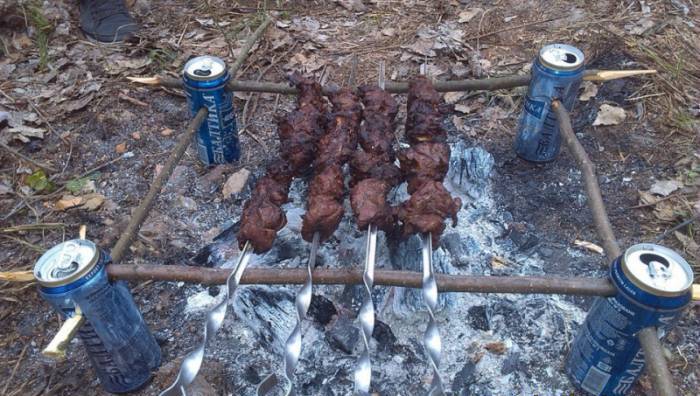
If you don’t have a regular barbecue on hand but there are a few empty beer cans nearby — you already have what you need for a makeshift grill. This DIY beer can barbecue takes only a few minutes to make, is lightweight, convenient, and perfect for cooking kebabs, sausages, or vegetables.
🥫 How to make a beer can grill: step-by-step
- Prepare 8–10 aluminium cans. They should be empty and clean. Choose cans of equal height for a stable structure.
- Arrange the cans in two parallel rows about 25–30 cm apart. This will be the base that supports the skewers.
- Place skewers on top. Use 2–3 skewers or a small metal grate to create a stable surface for grilling.
- Build a fire beneath the setup. Use dry twigs or charcoal — avoid plastic or wet wood.
This setup is ideal for outdoor conditions since a beer can barbecue requires no tools, welding, or special materials. Plus, it’s easy to clean up afterward, leaving no litter behind.
✅ Advantages of a beer can grill
- Quick to assemble — no tools or costs involved;
- Lightweight and portable — perfect for camping, fishing, or picnics;
- Minimal waste — cans can be recycled afterwards.
⚠️ Safety tips
- Aluminium deforms easily under heat, so don’t overload the setup;
- Don’t place cans on unstable ground — use stones or soil for support;
- After cooking, don’t touch the cans — they get extremely hot.
This method is perfect for spontaneous picnics and travellers who value minimalism, practicality, and speed. Most importantly — you’ll still enjoy the taste and aroma of grilled meat, even without a traditional barbecue!
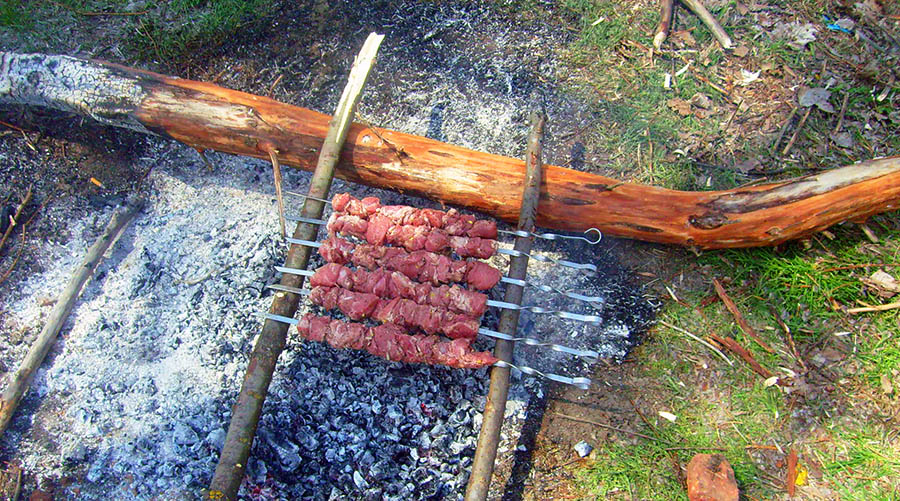
Skewer Grill — the minimalist option for a hassle-free picnic

If you don’t have any materials to build a structure but you do have a few skewers — that’s enough to cook a delicious kebab. A skewer-only barbecue is a minimalist solution that lets you prepare food quickly without bricks, cans, or metal grates.
🔥 How to make a skewer grill: step-by-step
- Choose a flat area on the ground, preferably free of dry grass. It should be stable and safely distant from trees or bushes.
- Dig a shallow pit or mark the fire area with stones to contain the flames.
- Build a fire and wait until you have glowing embers. You need steady heat, not open flames, for proper cooking.
- Set the skewers parallel across two supports (stones, bricks, or branches). The height should be around 10–15 cm above the coals.
- Place meat or vegetables and turn them regularly to prevent burning.
This method is convenient if you want to cook kebabs on a hike without extra gear. The key is to balance the skewers properly so they don’t slip and to distribute the heat evenly.
✅ Benefits of a skewer grill
- No materials needed — just soil and skewers;
- Works in any setting — mountains, forest, or riverside;
- Perfect for small groups or quick stops on a trip.
⚠️ Things to watch out for
- Use metal skewers — plastic or wooden ones may melt or burn;
- Don’t cook directly over flames — the meat will burn outside but stay raw inside;
- Check the stability of your setup to avoid the skewers falling into the fire.
If you don’t have any supports, you can make some from two thick green branches shaped like forks — just stick them into the ground on either side of the fire. This kind of campfire grill is perfect for hikers, adventurers, and outdoor enthusiasts.
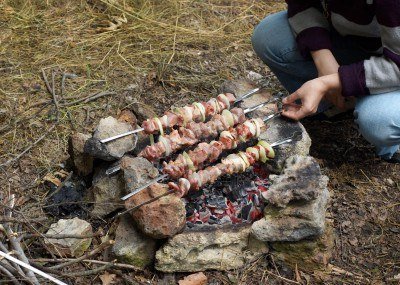
Brick or Stone Barbecue — the reliable classic for grilling outdoors
A brick or stone barbecue is one of the simplest yet most effective ways to grill outdoors. It provides stable heat, doesn’t deform under high temperatures, and can be reused many times. Plus, you can assemble it in just 10 minutes with no tools required.
🧱 How to make a brick or stone grill: step-by-step
- Choose a safe spot — a flat area free from dry grass, and far from trees or tents. Clear it of leaves, branches, and debris.
- Prepare materials — 8–12 solid bricks or medium-sized stones that aren’t crumbling or damp. Avoid limestone — it can crack under heat.
- Lay the base — two parallel rows of bricks or stones, about 25–30 cm apart for the coals. Stack them 2–3 layers high.
- Place the skewers or grate on top of the walls. They should be stable and heat-resistant.
- Light the fire inside and wait for even embers before cooking.
🔥 Tips for effective heat
- Use dry hardwood (oak, hornbeam, acacia) — it provides long-lasting, steady heat;
- Avoid burning rubbish or plastic — it’s toxic and ruins the taste of food;
- Spread the coals evenly to prevent undercooked or burnt meat.
✅ Benefits of a brick or stone grill
- Durable and heat-resistant structure;
- Safe — fire is contained within the walls;
- Ideal for large groups — multiple skewers at once;
- Can be turned into a permanent backyard or campsite barbecue.
This method is especially convenient for camping, cottages, or long stays. If you often cook outdoors, a brick barbecue will be your reliable companion — easy to dismantle and rebuild whenever needed.
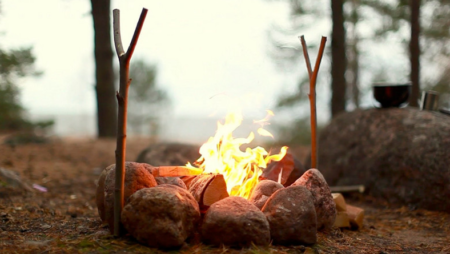
Branch Grill — when all you have is the forest: simple tool-free designs
A branch grill is the simplest way to cook over a campfire when you don’t have bricks, grates, or supports. The idea is to use fresh (moist) sturdy branches as supports or as a “grate” for skewers or a pot. It can be set up in 5–7 minutes and works in any outdoor conditions.
🌲 Option 1: Forked branches + crossbar
- Find two thick green branches shaped like forks (Y-shaped), about 60–80 cm long and 3–5 cm thick.
- Stick the forks into the ground on both sides of the fire, facing inward and at the same height.
- Lay a crossbar across the forks — this beam will hold your pot, kettle, or skewers.
- Control the heat: cook over embers, not open flames — it gives steady heat and less smoke.
🌿 Option 2: Grate made of fresh branches
- Make two side supports: from stones or thick logs (fresh), about 10–15 cm above the embers.
- Lay 5–7 green rods (1.5–2 cm thick) across them, leaving 1–2 cm gaps for airflow.
- Place skewers or thin metal rods on top. Replace the branches if they start charring.
🪵 Option 3: Tripod hanger
- Tie three long green poles (1.5–2 m) together at the top with cord or wire to form a tripod.
- Hang your pot or grill grate from a chain or adjustable wire.
- Cook over embers, raising or lowering the chain to control heat.
✅ Advantages
- No tools or metal parts needed; quick assembly in minutes.
- Works with any campfire, easy to adjust height and heat.
- Leaves minimal trace after use — fully eco-friendly.
⚠️ Safety and eco-tips
- Use fresh (moist) branches — dry ones burn quickly and lose strength.
- Avoid resinous woods (pine, spruce) near food — they produce soot and bitterness.
- Don’t break live trees: collect fallen branches or deadwood instead.
- Cook on embers, not open fire — safer and provides more even heat.
This branch barbecue is all about simplicity and respect for nature. It’s perfect for forests, riversides, or mountain settings — whenever you need to cook quickly and safely without special gear.
Alternative DIY Barbecue Ideas: creative solutions for unexpected situations
Sometimes circumstances force us to improvise. When you don’t even have the basics for a campfire setup, there are clever ideas that will help you cook even in the most unusual situations. The key is to think logically, stay safe, and respect nature.
🔥 Barbecue from metal items
- Metal barrel or bucket. If you have an old metal bucket or drum, drill a few holes for airflow and place skewers on top. Fill it with charcoal or small firewood, and you’ve got yourself a mini-barbecue.
- Washing machine lid or metal sheet. In the wild, a metal sheet can act as a base for a simple grill — just raise it on stones or bricks for better ventilation.
🧱 Barbecue from natural materials
- Clay or wet soil. Shape a simple “bowl” or “trough” out of clay — it can withstand the heat if the layer is thick enough (at least 10 cm).
- Sand structure. If you’re on the beach, dig a hollow in the sand, line it with stones, and light a fire inside. Once the embers are ready, place a grate or skewers on top.
♻️ Barbecue from scrap metal
- Old car rims. Stack one or two steel rims — they form a sturdy heat chamber that retains temperature well and can even hold a pot.
- Old oven rack or grill grate. Use it as a surface for cooking by placing it on stones or bricks above the embers.
⚠️ Important safety tips
- Never use plastic, aluminium, or painted metal — they release toxins when heated;
- Ensure your setup is stable — prevent tipping or collapsing fires;
- After cooking, extinguish the embers with water or cover them with soil to avoid smouldering coals;
- Always clean up the area — leftover metal, cans, or bricks pollute the environment.
Experiment, but always prioritise safety. A makeshift barbecue can be just as effective as a store-bought one if built wisely. Most importantly, it lets you enjoy the real flavour of outdoor grilling — even in the most unexpected situations.


No Comment
You can post first response comment.